


You got yourself a Cameo Silhouette, and your ready to make your first sign! But where do you start? If you have JUST set yours up, take some time to play with the program. Click all the icons, see what they all do … you don’t need to be an expert on it all, but start to familiarize yourself with options. Even if its just to be familiar with not having any clue what some of the options are! ( .. like making, releasing compound path.. welding.. the stuff that makes you want to pour another glass of wine…)
There are lots of tips and ticks out there. I started out a couple years ago, slowly learning what the ins and outs. How I would make a file and a sign 5 years ago has drastically changed! I absolutely love and still use https://silhouetteu.com/. I highly recommend checking her page out!
Today I am going to show you how I create simple files for a word sign. And also show you my trick for lining up my stencil to my board. Nothing make you need a glass of wine more then stressing over if its even or not… and nothing makes you want to drink a bottle more.. then when you realize your newly painted letters are not straight on your board!
Let’s make the Sign:
Everything is Figureoutable
What do you need:
- Cameo Silhouette Cutter
- Silhouette Studio Software
- Vinyl for Stencil making*
- Cutting mat
- Tweezers or weeding tools
- Board for your sign
*Note on vinyl: I prefer Oramask 813 for my stencils. Its easy to cut and easy to peel off my project once the paint is dry. A non permanent or removable vinyl will also work. I would avoid permanent vinyl as it may life the paint or wood from your finished product.
Step One: Choose your Sign
Low stress, open your wine and let it breath.
How big i your sign? You need to create a stencil that fits the size of your sign. In Silhouette Studio we will change the size of you page to match your sign so you can see what the finished product will look like.
Measure the inside of the board where the stencil will go.
My example for today will be on a board that is 11.5″ (29cm) x 5.5″ (14cm)

Step Two: Change your media size to match your board size.
Low Stress, Pour yourself a glass, 5 minutes.
Open Silhouette Studio.
By default, your page set up should look like this:

You will see Tool Bars on the Left side of your page, on the Top and on the Right side. There are several ways to reach these options and I encourage your to play with them so that they start to become more and more familiar to you.
Nothing pushes you to open another bottle more than knowing there was an option to centre your work but then not being able to find it! The HELP tab at the top will be your best friend! If you can not find the feature or option, type in a key word of what you are trying to do and HELP will point you in the right direction!
Let’s get started:
On the Right hand tool bar, click Page Set Up. I will show you how to create and cut a file with and without a mat.
MAT:

No MAT:

Step 3: Add your text and choose Font.
Low to High Stress depending on your personality, half a glass, 10 Minutes.
Lets quickly talk about the two styles of text box you’ll see. No, put down the glass, this part is easy to figure out.
You will notice the text box is green or black. Why?? You can change size, font style and many other attributes with both boxes. But each does have some unique features.
Green high light allows you to create line breaks in your text, change some lettering or sizes within the box, as well as create curves or have your text follow a specific path (more on that later!)
The Black highlight allows you to move everything at once, change all lettering to the same font and size, turn the text box and more.


So let’s start with our saying.
Click the A on the Left side tool bar. Drag your cursor to the page and left or click once. Type out your phrase.
Once you have your saying typed in, click until you have the black box outlining your saying. If I left click once I get the back box outline, if I double click I will get the green box.
With the box highlighted, go to your right tool bar and click the A|. This is an easy way to change the fonts without having to highlight all the letters. Play with the different fonts until you find something that calls to you. You will have to adjust sizing depending on what you choose, but don’t worry about making those changes until you know which font you are going with.

I’m using Sharpie Pen
After you have selected your font, have a sip of wine. You made it this far and deserve a sip!
I am intentionally choosing a script font so I can show you the WELD tool. When you have letters that overlap any part of the saying, its important to weld! Do not WELD until the end! It stops you from being able to edit the phrase.
Step 4: Sizing the Stencil
Low stress, finish your first glass, 5 minutes.
Now it’s time to size. Grab the black box corner and drag it until you are happy with your size within the box page you created. Use the JUSTIFY icons to move the text to a Right, Left or Centre spacing. I am using JUSTIFY CENTRE.

Double click for the green box, and increase or decrease box size to fit your text. If it changes your text layout, you have made the box too small, adjust until it keeps your layout but doesn’t have excess around your text. This is important so that when we centre later, you get the most accurate centre. The program will centre the box for you.
Sip and Review:
- Click the A on the left hand side
- Type out wording
- Choose Font
- Adjust size of font AND box
- Use Transform box to centre.
Step 5: Center and Align
Low stress, 3 sips, 5 minutes.
Adding alignment marks will make it much easier to centre and use when we place our stencil on our board. I add 4 small shapes to each side of the page, it allows me to easily line up and ensure my sign goes on straight. Left side tool bar, click the shape rectangle. This now allows you to draw a rectangle on your page. Make a small box (o.1″ approximately). Go back to your Left side tool bar and click the Arrow (select) icon. Otherwise you’ll start drawing rectangles all over your media and will start drinking heavily.

If you do forget to hit select, there is an awesome ‘Undo’ button on the Top tool bar.
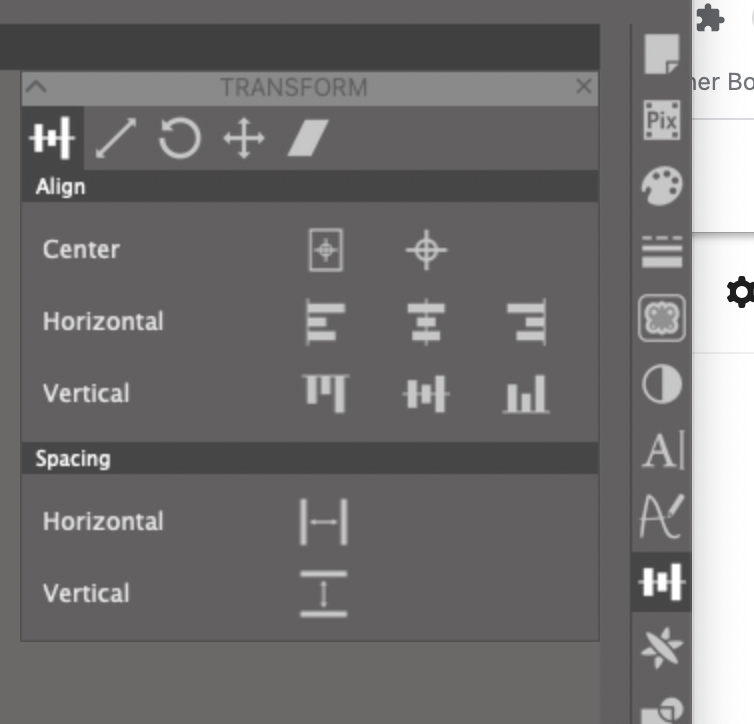
Let’s start with the top square. Click the Transform icon to open the panel. Click the horizontal middle option. Do the same with the bottom circle. For the left and right circle, chose the Vertical Middle option. Make sure the circles are not too close to the edge, but enough space from the lettering.

Step 6: WELD and Group
Medium Stress when new to this, 3 sips of wine, 5 minutes.
If you have chosen font that overlaps itself, you NEED to to this step. Even more important if you were cutting HTV or other craft products. Every red line is a cut line. So when the script overlaps, you will get small pieces cut out exactly how its shows on your screen. There is a very east way to get rid of this BUT do it once you are 100% happy. Once you’ve WELD you have stopped it from being font and made it into a graphic. You can still increase or decrease size but you could not change or add to the text without starting from a new text box.
Go to you Right side tool bar and click the intercepting Circle and Rectangle. This is your Modify Panel. Click you text so the black box comes up. Then hit the WELD icon.
Your page should go from this:


To this:


Now it’s time to group everything so you don’t accidentally move parts of your image. Click at any corner and drag and capture all aspects of the media page, your text, alignment marks and large rectangle.

Go to Object on Top Tool bar, click MAKE COMPOUND PATH.
Step 7: Change page setting and Cut Vinyl.
You’ve made it this far, but now your wine glass should be empty so please go refill! Low stress, 10 minutes.
Click Page Setup on left tool bar.
With OR Without Mat: Media size Auto 12×12. Make sure your Cutting Mat option matches how you are loading the machine.
Since you’ve grouped your work, you can now drag the entire object to centre to your new media size. Drag and Drop so all red lines are within the media.
When I first started, I would try and save every scrap, area or opportunity to have the vinyl go further. What I have learnt over the years… don’t be cheap. Its never worth it! When you make your stencil too small you run the risk of painting over the stencil as well as misalignment.
Let’s load your machine. When you are new this can be very frustrating. The more you use your machine, the easier it becomes.
Click SEND on the top right hand BLUE highlighted tool bar.

Go to Material and select the material that best matches your vinyl. Since I am using Oramask 813, I will use Vinyl, Matte. This automatically sets my Depth to setting 1, Force to setting 10 and Speed to setting 5. When I do have small font, or very fine lines, I will reduce my speed. For this stencil these settings are fine.
Most good vinyls will come with settings for both Silhouette and Cricut. You can adjust your the Depth, Force and Speed to match your vinyl recommended settings. When it comes to frustration levels when learning how to use your Cameo… settings will be at the top. Nothing is more frustrating or will push you to open more bottle than your media not cutting properly. Just remember, when you get a bad cut, it can happen to all of us. The more experience you have with your machine, the more comfortable you will be adjusting when needed.
The most important tip I can give you when learning or using a new product you haven’t cut on before:
DO NOT UNLOAD until you’ve tested the cut. When it’s finished cutting, take your weeding tool and try and lift sections of your cut there are easy to reach. If you see its cuts well, you can now unload. If you see it’s sticking or not deep enough – you can REPEAT job.
Back to your computer! On the top right hand corner, click SEND.
Material we are going to choose Vinyl, Matte from the drop down box. This window will default to Cut and Autoblade, which is exactly what we need! Since I have used this vinyl a lot and am very familiar with it, I know this is the correct setting for it. It automatically sets up to Blade 1, Force 10 and Speed 5. If you have not used a particular brand of vinyl before, you can click “TEST” on the bottom right hand side. It will cut out a small triangle on your vinyl so you can see if it cut all the way through and adjust from there.
If you are happy with your test, next step is to hit send and let your Cameo do the rest!
Once its complete, unload, trim your stencil and start weeding to complete your stencil!
You are now ready to paint.
Check out my blog on how to paint the perfect sign with little to no bleeding!
How to paint the perfect sign.
1 comment